Imagine biting into a perfectly golden, delightfully chewy bagel, still warm from the oven, its crust adorned with your favorite seeds, and its interior soft enough to cradle a generous schmear of cream cheese or juicy slices of summer tomato. What if we told you that this bakery-quality experience isn't just a dream, but an entirely achievable reality in your own kitchen? Forget the long lines and the sometimes-stale store-bought versions. Crafting very good bagels at home is surprisingly easy-ish, too, and undeniably rewarding.
This comprehensive guide will demystify the bagel-making process, transforming what might seem like a daunting baking project into a simple, satisfying endeavor. You'll learn the secrets to that signature chewy texture, the golden sheen, and how to create bagels that truly rival your favorite local bagel shop. So, tie on your apron, gather your ingredients, and prepare to become a kitchen rockstar!
Why Homemade Bagels Are a Game-Changer (and Surprisingly Simple!)
Many home bakers shy away from bagels, intimidated by their unique characteristics and the perceived complexity of the process. However, as countless enthusiasts have discovered, the magic of pulling a tray of warm, golden bagels out of your own oven is an unparalleled kitchen win. This isn't just about baking; it's about creating an experience.
One of the biggest myths surrounding bagels is that they require fancy tools or advanced techniques. The truth is, with basic pantry ingredients, a pot of water, and a little patience, you can produce exceptional results. This easy homemade bagels recipe is one of those culinary triumphs that feels impressive but is actually very straightforward once you understand the core steps. The aroma alone as they bake is worth the effort, and once you taste the fresh, nuanced flavor of a homemade bagel, it's genuinely hard to go back to store-bought varieties. They truly are better than store-bought.
The Allure of the Homemade Bagel:
- Unmatched Freshness: Nothing beats a bagel straight from the oven.
- Customization Galore: Experiment with an endless array of toppings and flavors.
- Sense of Accomplishment: Impress friends and family with your baking prowess.
- Cost-Effective: Making them at home is often more economical than frequent bakery visits.
The Secret to that Signature Chewy Texture: Key Steps Explained
What sets a bagel apart from just a bread roll with a hole? It's that distinctive, satisfying chew. Achieving this texture is key to making truly *very good bagels*. It comes down to a few critical techniques, each playing a vital role in the final product.
1. Knead the Dough for Gluten Development
Unlike many light, airy bread recipes, bagels are made with a relatively low-hydration dough. This means it's stiffer and requires vigorous kneading to develop the gluten strands. Gluten is the protein network that gives bread its structure and, crucially for bagels, its chewiness. If you skip or skimp on kneading, your bagels might end up tasting more like regular bread rolls. The good news? A food processor makes this task incredibly quick, often in as little as 90 seconds!
2. Embrace Barley Malt Syrup
This seemingly niche ingredient is a secret weapon for authentic bagels. Barley malt syrup contributes a unique, subtle sweetness, a distinct malty flavor, and helps achieve that beautiful golden-brown crust. It's a natural sugar that caramelizes beautifully during baking. While you can substitute with honey or brown sugar in a pinch, barley malt syrup offers a superior flavor profile and deeper color, making your bagels truly stand out.
3. The Essential Egg Wash
For that coveted golden sheen and to ensure your toppings adhere beautifully, an egg wash is indispensable. A simple whisked egg (sometimes with a touch of water or milk) brushed over the boiled bagels creates a glossy, appetizing finish. Commercial bakers often use lye baths for an even deeper color and crispier crust, but for the home baker, an egg wash is the perfect, safe, and effective alternative.
4. The Crucial Boiling Step
Perhaps the most defining characteristic of a bagel, boiling is not just a preliminary step – it's fundamental to its texture. Boiling the shaped dough in a water bath for a short period (around 30 seconds per side) gelatinizes the starches on the exterior of the bagel. This process "sets" the crust, creating a shiny, slightly tough exterior that contrasts wonderfully with the soft, chewy interior. It also prevents the bagels from fully puffing up like a regular roll, maintaining their dense, chewy structure.
How to Make Homemade Bagels: A Step-by-Step Guide
Ready to embark on your bagel-making journey? Here’s how to create those incredible, chewy bagels from scratch, simplified for your kitchen.
Ingredients You'll Need:
- All-purpose or bread flour
- Salt
- Instant yeast
- Warm water
- Barley malt syrup (or honey/brown sugar)
- Egg for egg wash
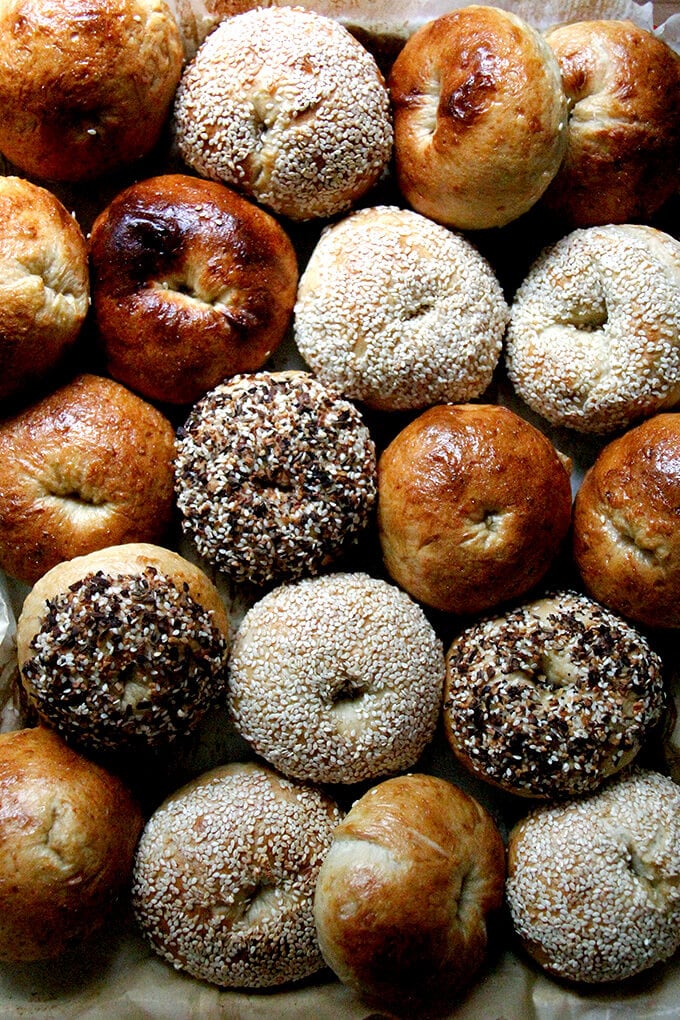
- Desired toppings (sesame seeds, poppy seeds, everything bagel seasoning, etc.)
- Olive or grapeseed oil (for greasing)
Step-by-Step Instructions:
1. Prepare the Dough
In a food processor or the bowl of a stand mixer, whisk together the dry ingredients: flour, salt, and instant yeast. In a separate bowl, whisk together the warm water and barley malt syrup. Add the liquid mixture to the dry ingredients and knead. If using a food processor, this takes about 90 seconds until a stiff, shaggy dough forms. If using a stand mixer with a dough hook, knead for 5-7 minutes until the dough is smooth and elastic. The dough will be quite firm – that's normal for bagels!
2. First Rise (Overnight for Best Results!)
Lightly grease your hands with olive or grapeseed oil and transfer the dough to a lightly oiled bowl, turning to coat. Cover the bowl with a lid or plastic wrap and transfer it to the fridge. An overnight rise (8-12 hours) is highly recommended. The cold fermentation develops deeper flavors and a better texture, making your very good bagels even better! If you're short on time, you can do a shorter warm rise (1-2 hours) until the dough has slightly puffed, but the overnight method yields superior results.
3. Portion and Rest
Turn the cold dough out onto a lightly floured work surface. Using a scale for accuracy, portion the dough into 12 equal pieces (each usually around 90-100 grams). Roll each piece into a tight ball. Cover the dough balls with a clean kitchen towel or plastic wrap and let them rest for 1 hour. This resting period allows the gluten to relax, making the dough easier to shape.
4. Shape Your Bagels
This is where the magic happens! With your thumb, poke a hole directly in the center of a dough ball. Then, using both hands, gently stretch and rotate the dough to enlarge the hole, aiming for a ring about 2-3 inches in diameter. Don't be afraid to be a little aggressive; the dough is resilient. The hole might seem large, but it will shrink during boiling and baking. Repeat with the remaining dough balls.
5. Prepare for Boiling
Fill a large pot with water and bring it to a rolling boil. Add a tablespoon of barley malt syrup (or honey) to the boiling water – this enhances flavor and helps with browning. Preheat your oven to 425°F (220°C). Line a large baking sheet with parchment paper and lightly grease it.
6. Boil the Bagels
Carefully drop 2-3 bagels into the boiling water at a time, ensuring not to overcrowd the pot. Boil for 30 seconds on one side, then flip them over with a slotted spoon or spider and boil for another 30 seconds on the other side. For an extra chewy bagel, you can extend the boiling time to 60-90 seconds per side, but be mindful not to over-boil as this can make them too dense. Transfer the boiled bagels to a clean tea towel-lined sheet pan to drain excess water.
7. Egg Wash and Season
Once all bagels are boiled, gently transfer them to your prepared parchment-lined baking sheet. In a small bowl, whisk one egg (with a teaspoon of water if desired) to create your egg wash. Brush each bagel generously with the egg wash. Immediately dip the egg-washed side into your desired seasonings – everything bagel seasoning, sesame seeds, poppy seeds, minced garlic, or coarse salt. The egg wash will help the toppings stick beautifully.
8. Bake Until Golden
Bake the bagels in your preheated oven for 18-22 minutes, or until they are deeply golden brown and cooked through. The exact time may vary slightly depending on your oven. Once baked, transfer them to a wire rack to cool slightly before slicing and enjoying.
Beyond the Basics: Tips for Customizing Your Bagels & Troubleshooting
Once you've mastered the basic recipe, the world of bagel possibilities opens up!
Customization Ideas:
- Everything Bagels: A classic for a reason! Combine poppy seeds, sesame seeds (white and black), dried minced garlic, dried minced onion, and a pinch of flaky sea salt.
- Cinnamon Raisin: Incorporate plump raisins into the dough during the kneading stage and sprinkle with a cinnamon-sugar mixture before baking.
- Cheese Bagels: Top with shredded cheddar or mozzarella during the last 10 minutes of baking for a melted, crispy cheese crust.
- Garlic & Herb: Mix dried herbs into the dough and top with roasted garlic chips or fresh chopped chives.
Troubleshooting Common Issues:
- "My bagels are too dense/hard": This could be due to over-kneading (rare with this recipe) or not letting the dough rest enough after shaping. Also, ensure your yeast is active.
- "My bagels aren't chewy enough": Ensure you're boiling for at least 30 seconds per side. Inadequate gluten development (not enough kneading) can also be a culprit.
- "My bagels are flat": Over-proofing (letting them rise too long before boiling) or not enough tension when shaping can lead to flatter bagels. The cold overnight rise helps prevent this.
- "My toppings fall off": A good, generous egg wash applied immediately before dipping in seasonings is key.
Store leftover bagels at room temperature in an airtight container for 2-3 days, or slice and freeze for longer storage. To refresh, simply toast them from frozen or lightly mist with water and warm in the oven.
Making very good bagels at home doesn't have to be intimidating. With this foolproof guide and a few simple, yet crucial, techniques, you'll be pulling warm, bakery-quality bagels from your oven in no time. The process is straightforward, the ingredients are basic, and the reward is truly delicious. So go ahead, give it a try – your taste buds (and brunch guests!) will thank you for it!
